In the previous post, we created a robust API that allows us to fetch articles with fields such as “title” and “content”, as well as the ability to update, create, and delete articles. In this post, we will be using the API to retrieve these articles and display them in a Flutter app, however, we will not be utilizing the API’s ability to modify articles.
With the foundation of the API established, we can now turn our attention to creating a dynamic and visually appealing interface using Flutter.
Flutter is an open-source mobile application development framework created by Google. It was first released in 2017 and has since then become one of the most popular frameworks for developing mobile applications for Android and iOS. Flutter is built using the Dart programming language, which was also created by Google.
One of the most significant advantages of using Flutter is its fast development time. Flutter uses a hot reload feature which allows developers to quickly see changes they make in the code in real-time on their device or emulator. This speeds up the development process and makes it easier for developers to fix bugs and make changes to the app quickly.
Before we dive into building our Flutter app, it’s important to ensure that you have the necessary tools and environment set up for Flutter development.
Install Flutter and set up your development environment by following the instructions on the Flutter website (https://flutter.dev/docs/get-started/install).
Now open a terminal and navigate to the directory where you want to create your Flutter project.
Run the following command to create a new Flutter project:
flutter create article_appThis will create a new Flutter project with the name article_app.
Change into the newly created project directory:
cd article_appNow you can install required package by running following command:
flutter pub add httpThis will add a line like this to your package’s pubspec.yaml
dependencies:
  # other packages
  http: ^0.13.5 # It's needed to make a network requests
Open the project in your preferred text editor or IDE and in your AndroidManifest.xml file, add the Internet permission.
<!-- Required to fetch data from the internet. -->
<uses-permission android:name="android.permission.INTERNET" />
Create a new file named article.dart inside lib directory and add the following code to define the article model:
class Article {
  final String title;
  final String content;

  const Article({
    required this.title,
    required this.content
  });

  factory Article.fromJson(Map<String, dynamic> json) {
    return Article(
      title: json['title'],
      content: json['content'],
    );
  }
}
Now we need to fetch data from the API, start by create a new file named api.dart and add the following code to fetch the data from the API:
class Api {
  static const String url = 'http://example.com/api/articles';// Your API URL

  static Future<List<Article>> getArticles() async {
    final response = await http.get(Uri.parse(url));

    if (response.statusCode == 200) {
      // If the server did return a 200 OK response,
      // then parse the JSON.
      final data = jsonDecode(response.body) as List;
      return data.map((e) => Article.fromJson(e)).toList();
    } else {
      // If the server did not return a 200 OK response,
      // then throw an exception.
      // This can happen if app can't reach the api
      // or if something is wrong with the API.
      throw Exception('Failed to load articles');
    }
  }
}
Here you can see I’m using a domain name (example.com) for the URL of the API, but you can use your local IP address if you want to test this locally.
Open the main.dart file and add the following code to create the main screen:
import 'package:article_app/api.dart';
import 'package:article_app/article.dart';
import 'package:flutter/material.dart';

void main() {
  runApp(const MyApp());
}

class MyApp extends StatelessWidget {
  const MyApp({super.key});

  // This widget is the root of your application.
  @override
  Widget build(BuildContext context) {
    return MaterialApp(
      title: 'Articles',
      theme: ThemeData(
        primarySwatch: Colors.blue,
      ),
      home: const MyHomePage(title: 'Articles Home Page'),
    );
  }
}

class MyHomePage extends StatefulWidget {
  const MyHomePage({super.key, required this.title});

  final String title;

  @override
  State<MyHomePage> createState() => _MyHomePageState();
}

class _MyHomePageState extends State<MyHomePage> {
  late List<Article> articles = [];
  bool isLoading = false;

  @override
  void initState() {
    super.initState();
    _fetchData();
  }

  Future<void> _fetchData() async {
    setState(() {
      isLoading = true;
    });
    final data = await Api.getArticles();

    setState(() {
      articles = data;
      isLoading = false;
    });
  }

  @override
  Widget build(BuildContext context) {
    return Scaffold(
      appBar: AppBar(
        title: Text(widget.title),
      ),
      body: isLoading ? Center(
        child: CircularProgressIndicator(),
      ) : RefreshIndicator(
        onRefresh: _fetchData,
        child: ListView.builder(
          itemCount: articles.length,
          itemBuilder: (context, index) {
            final article = articles[index];
            return ArticleWidget(article: article);
            },
        ),
      )
    );
  }
}

class ArticleWidget extends StatelessWidget {
  final Article article;

  const ArticleWidget({
    required this.article
  });

  @override
  Widget build(BuildContext context) {
    return Container(
      padding: EdgeInsets.all(16.0),
      child: Column(
        crossAxisAlignment: CrossAxisAlignment.start,
        children: <Widget>[
          Text(
            article.title,
            style: TextStyle(
              fontSize: 24.0,
              fontWeight: FontWeight.bold,
            ),
          ),
          SizedBox(height: 8.0),
          Text(
            article.content,
            style: TextStyle(
              fontSize: 16.0,
            ),
          ),
        ],
      ),
    );
  }
}
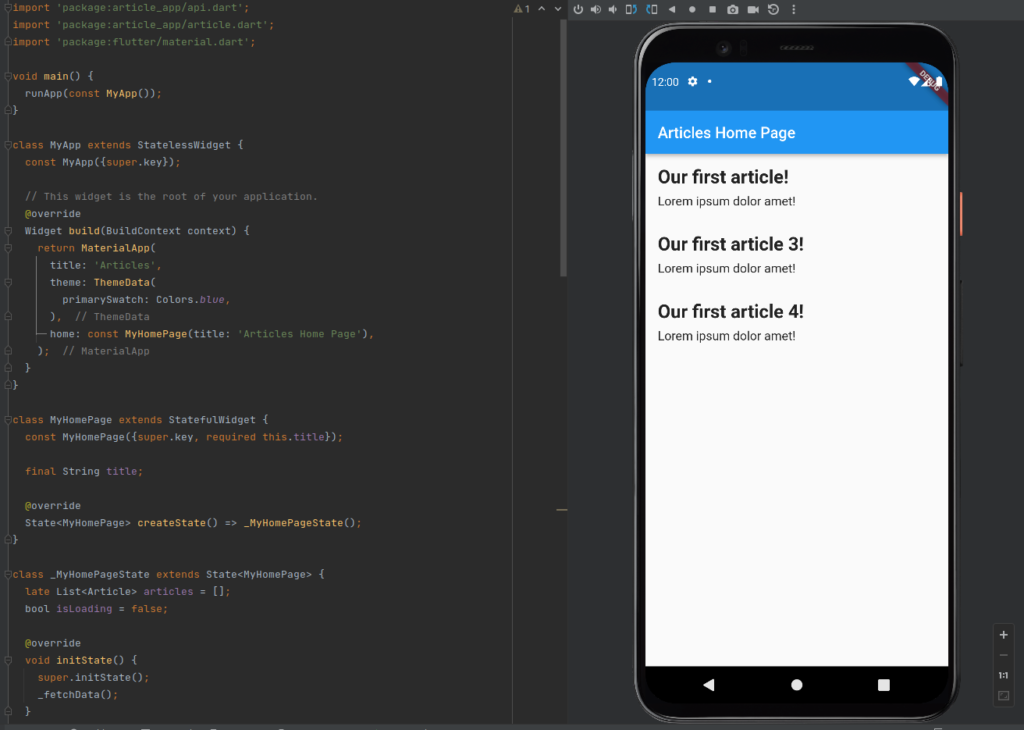
Now after running the application, the final result of our work is:

In this post, we created a Flutter app that fetches data from API we created in the last post, receives title and content both strings, and displays them on a single page. The MyHomePage widget is a StatefulWidget because it requires a state to keep track of the loading state and the list of articles. The ArticleWidget is a StatelessWidget because it only displays the data and does not require any state updates.
The MyHomePage widget uses the RefreshIndicator a widget that supports the Material “swipe to refresh” idiom to add the drag-to-refresh functionality. The ArticleWidget displays the title and content of an article in a Container with a Column layout.
I hope this post provides you with a good understanding of how to create a Flutter app that fetches data from an API, displays it on a single page, and implements drag-to-refresh functionality.
That’s it for now. In the end, programming is about solving problems and bringing ideas to life, and with every keystroke, we take one step closer to making our vision a reality.


3 comments On Building a Simple Blog Mobile App with Flutter, Golang Fiber API and SQLite – part 2
Is it possible to use wordpress rest api with flutter?
Of course. A lot of mobile apps use wp rest, if the web application is based on wordpress.
I have a feeling that all flutter apps looks the same, similar to all the bootstrap apps.